Solar Power Design
Step 1 – How much power do you use?
Step 2 - The Battery Bank
Step 3 - What Solar Panels do you need?
Step 4 - The Solar Charge Controller
Step 5 - Mounting the Solar Panels
Step 6 - Connecting the Solar Power System
Step 7 - The Battery Bank is flat.
STEP 1 - HOW MUCH POWER DO YOU USE
To work out your power requirements, you need to look at all the devices to be connected to your solar power system. Each device will have a wattage rating which can be obtained usually by googling the model and the words watt power.
If you cannot find the watt rating of the device using google, you can use a multimeter or a very good device to have on hand is a product called a kill-a-watt. A Kill-a-watt is a device with a similar shape to a surge protector with a small screen. It tells you how many watts per hour the device that you plug into it will be using.
Important Note:
You should always look for 12 volt equipment. If your device can not handle a 12 volt supply you will need to get a 12volt DC to X volt DC Converter which means loosing some power during the conversion. The above mentioned reference devices can handle a direct connection to a 12 volt battery which makes them suitable for solar use.
Another important note is that you should only use DC devices. If the device's transformer says it has an AC output, then it will have extra supply requirements that cost more and has a power loss through the DC to AC conversion.
Once you have worked out the watt ratings of all your devices, add them together.
If we had 5 units of 12V DC CFL - 7W Solar Lamps, we would be using a total of 35 watts per hour.
To work out how many watts per day, multiply the hourly usage by 24.
For our 5 Solar Lamps the wattage per day is 840 watts.
STEP 2 - THE BATTERY BANK
A Battery bank is used to store captured solar power for using at night or on rainy / overcast days. Your battery bank needs to be made of one or more deep cycle battery that will run your equipment for a number of days without sunlight. A good goal in most areas would be to run for 4 or 5 days without sunlight.
What is a deep cycle battery?
A Deep Cycle Battery is a special type of large capacity battery which can be discharged regularly to about 50% of its capacity. They are a similar size to a car battery but the difference is the chemicals inside.
A car battery is designed to be discharged only a small amount, then recharged instantly. Discharging a car battery will leave it with a very bad memory effect and this effect worsens as it goes without being recharged. 20 large discharges may damage a car battery and stop it from ever being fully charged again, where as a deep cycle battery can handle several hundred deep discharges, and go longer without being recharged.
Even with the discharge capability of a deep cycle battery, it should never drop below 50% of its capacity, but can go several days or sometimes weeks without being recharged and still be as good as new.
A Deep cycle battery will have a rating on the side. It will specify a voltage - usually 6 or 12, and an Amp-Hour / Ah rating. More expensive batteries will have a higher Amp-hour rating and therefore have a larger capacity. It is recommended that you purchase 12 volt batteries because your solar panels will most likely be 12 volt. If you need to purchase 6 volt batteries, they can be wired in a special way to increase the voltage to 12. You can purchase more batteries to add capacity as we will see below.
Wiring Methods
There are 2 ways to wire batteries together. You can use both at the same time if you like.
Parallel: This means that the Amp-Hour capacity of the batteries will be added together
Series: This means that the voltage of the batteries will be added together.
So what size battery bank do you need?
You will need a battery bank that will power your devices for a set amount of days without sunlight, and still not be discharged more than 50%. A good goal in most areas would be to run for 4 or 5 days without sunlight.
To work this out, we take the daily power usage, multiply it by the number of days without sunlight, and then multiply again by 2 so we factor in the 50% discharge limit.
In our 5 Solar Lamp sample;
5 Solar Laps is 840 watts per day.
Days Usage without sunlight is 4 days.
Thus 840 watts/day x 4 days x 2 equals 6,720 watts.
This means our battery bank capacity needs to be 6,720 watts.
To convert the watts back to amp-hours, we would divide by the battery voltage rating of 12 volts.
6,720 watts / 12 volts = 560 amp-hours
To achieve this, we could have:
5 units of 12 volt 120ah batteries wired in parallel.
For a 12vdc 600 amp-hour battery bank.
We could use 5 units of
TROJAN T1275-AGM 12V DC Deep Cycle Battery.
Types of Batteries
Flooded / Wet Cells: The older and more common type of deep cycle battery. Needs maintenance such as water top ups. Water is lost in gases when charging.
Gel or AGM: Are sealed and maintenance free. There is no gas lost because the battery case is sealed and a special solar controller needs to be used so that the built up pressure from the gasses does not damage the battery. Gel or AGM are able to deliver more power, faster and so are ideal for starting engines or using on boats.
STEP 3 - WHAT SOLAR PANELS DO YOU NEED
This depends upon the average daily sunlight hours in your area during rainy season.
Insolaton is the correct measurement to use. Insolation is a measurement of the sun's energy that reaches a specific area of the earth's surface. It is more accurate than sunlight hours as it takes into account the angle of the sun, and various other environmental factors.
Sunlight hours can easily be used where you are using less than 20 watts of load***
In the example scenario, we have 4 hours each day on average during the rainy months.
Sunlight hours in Manila, Luzon range between 4:17 each day in September and 8:36 for every day in April
The solar panel will need to be able to capture enough solar power to run your equipment for the day, as well as recharge your battery bank following a rainy or overcast period. It also needs to be able to do this during wet season.
Hours of sunlight is 4 hrs.
24 hrs of power for 5 Solar lamps is 840 watts
840 watts / 4 hours = 210 watts
We need 210 watts of solar panels.
A different calculation when we factor in the recharging after a rainy or overcast period. If it rained for 4 days, and on the 5th day it was sunny, that is 5 days worth of power that needs to be captured. In the example that is 4,200 watts worth of power. We also need to capture this power as fast as possible before it rains again. So to capture 4,200 watts of power during 4 hours of sunlight, that means we need a 1.050 watt panel.
(5 days x 840 watts per day) / 4 hours = 1,050 watt Solar Panel for 1 day of charging
If we wanted to, we could set a goal of recharging the batteries over 2 days. That means we have 8 hours to capture 6 days worth of power - which a 630 watt panel would be able to do.
(6 days x 840 watts per day) / 8 hours = 630 watt Solar Panel for 2 days of charging
If you decide to set a longer recharge period, you can save some money on solar panels, but will need to spend more on adding more capacity to your battery bank in case you only get one sunny day and it returns to rain.
It is also probable that if you have an average of 4 hours of sunlight per day in rainy season, that also means half the days will be rainy or overcast, and the other half would be sunny. This means that on the sunny day, there could be up to 8 hours to capture the required power instead of the 4 assumed above. It is best to oversize your panels just in case, so you should not rely too much on extra average sunlight hours from rainy days.
Few solar panels over 140 watts are available in 12 volt versions. So to achieve a 1,050 watt Solar Panel, we have to connect in parallel multiple panels.
We can use the
Kyocera KD140SX-UFBS which is a 140 watt 12V DC Solar Panel.
For 1,050 watt Solar Panel; 8 units of 140 watt solar module
For 630 watt Solar Panel; 5 units of 140 watt solar module
Types of Solar Panels
Polycrystalline: Are cheaper to produce, but are not as efficient as mono. Panels are usually larger for the same watt rating.
Monocrystalline: Are more expensive to produce but are more efficient than poly and can capture the more watts per square foot of solar cells.
Overcast Days: Some panels will still capture solar energy when there is a light overcast of cloud (bright white clouds) and they can sometimes work at up to 40% of the panel's rating. You may be interested in checking how your panel performs by using a multi-meter and testing the panel's output on an overcast day.
STEP 4 - THE SOLAR CHARGE CONTROLLERS
A solar controller can perform 6 main tasks
- Prevents power from the battery traveling back up and getting lost through the solar panel at night
- Prevents the panels from overcharging the battery by disconnecting them when the battery is full
- Gives an indication on the battery bank's State Of Charge
- Stops the batteries from being discharged too much by disconnecting your devices when the battery SOC gets too low.
- Counts how much power you have generated and how much power your devices have used
- Helps lower the amount of maintenance work required on your batteries by charging in certain ways
You will want to make sure you get a solar controller that will display the State of charge for your battery bank. This helps diagnose problems if your tower stops working and your customers need it fixed urgently.
STECA TAROM 4545
Sizing Solar Controllers
Your panels will have a maximum amp output current. If you have wired your panels in parallel, you will need to add together the maximum amp output current of each of them - you will want a controller that can handle at least this amount with plenty of capacity to spare. It may be wise to purchase a controller that handles double the current than what you need in case you wish to add more radios or panels in the future.
Also check if you have used gel or liquid flooded batteries and that the controller or regulator will work with your batteries. This is especially true if you use AGM or Gel batteries. The controller needs to be set to charge in a specific way so that it doesn't cause high gas pressure inside the sealed battery. Flooded batteries need ventilation because they are not completely sealed and gasses escape when charging.
The Load Output
One important feature of a solar controller is the load output. This is where you connect your devices. You must be careful with this feature though. Some controllers assume it will be to automatically control lighting and so switches the load output on in the evening and off during the day. Some controllers like the Steca brand pictured above-right, allow you to press a button to switch the load on or off, or use the menu to enable automatic functions such as turning it on x hours after darkness and off in the morning. The important thing is that it does allow the manual-only switching mode.
For our example;
We use 5 units of 140 watt solar panels with Ipm rating of 7.91A.
5 x 7.91A = 39.55A
We will use the Steca Tarom 4545; 12Vdc 45A as the controller which is sufficient for our example and with spare amperage.
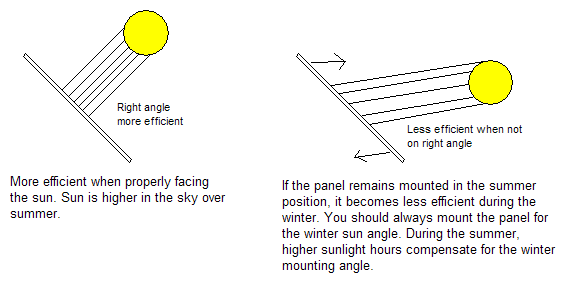
STEP 5 - MOUNTING THE SOLAR PANELS
For peak performance solar panels need to be installed at roughly the same angle as the latitude of your site, thus allowing to maximize the amount of sunlight falling on the solar panel.
In this case, you will mount your panel so its surface is perpendicular to the sun's rays during winter.
Fixed Tilt
If your solar panels will have a fixed tilt angle then you want to get the most energy over the whole year. A fixed angle is convenient, but note that there are some disadvantages. A fixed angle will get less power than if you adjusted the angle. Also, if you live where there is snow, adjusting the panels to a steeper angle in winter makes it more likely that they will shed snow. A panel covered in snow produces little or no power.
Use one of these formulas to find the best angle from the horizontal at which the panel should be tilted:
If your latitude is below 25°, use the latitude times 0.87.
If your latitude is between 25° and 50°, use the latitude, times 0.76, plus 3.1 degrees.
If the latitude is above 50 degrees, then the full year angle will be 41.1, while the average insolation on the panel will be 5.1 times.
This table gives some examples for different latitudes. It also shows the average insolation on the panel over the year (in kWh/m2 per day), and the energy received compared to the best possible tracker.
The latitude of Manila is 14.5833° thus the optimum full year tilt angle
14.5833 x 0.87 = 12.7°
More Solar Panel angle installation on http://www.solarpaneltilt.com/.
STEP 6 - CONNECTING THE SOLAR POWER SYSTEM
Size of wires for connections
We can refer to the specification requirement of the charge controller.
- From panel to controller, the specification is 4-AWG Stranded Wire or 2-AWG Single Wire.
- The same size of wire as above for battery bank to controller
- For the load, 14-AWG a normal lighting gauge specification in electrical codes.
STEP 7 - THE BATTERY BANK IS FLAT
So what do you do when you find its been raining for too long and your battery bank has gone flat. Ideally you should have
- A portable generator of around 300 watt with 12v DC and mains AC outputs - make sure the amp output of the 12v is less than your solar controllers limitation.
- A few backup batteries or pairs of batteries to swap into to your bank to run system for 2 days.
The first step would be to check the solar controller. Some with lcd screens will show an error code to help you diagnose the problem. If its just been raining too long then you will need to add another solar panel and expand the size of your battery bank to prevent it from happening again.
You can disconnect your solar panels, and connect the solar panel input of your solar controller to the 12v output of the generator and safely charge the battery bank and run your system again. For faster charging, you would disconnect the batteries from the solar controller and directly connect them to the 12v output of the generator.
Another way is to take out some fully charged batteries from your workshop and connect them in parallel to your battery bank - this will flow on to power your devices and slightly charge some of your batteries.


.bmp)

.bmp)
.bmp)

.bmp)
.bmp)
